Wednesday, 7 November 2012

A Small Finish!


In my previous post I mentioned that I wouldn't be undertaking anything significant until Zoe's quilt was finished. Well, I sat down and began quilting it last night. I had stitched two lines in the ditch when the globe on my sewing machine blew. So it was all over before it had really begun!

All was not lost. I tucked myself into bed and hand stitched the binding on to the back of my pieced Christmas ornament. I am so pleased with it! I cut a length of pink ribbon that would not only work as a hanging loop on a Christmas tree, but also on a door knob. Not everyone decorates a tree at Christmas time (though I imagine my friend would welcome some Christmas adornments in her home), so I wanted some versatility built in.
If I were to make another I would cut the binding strip slightly wider at 1 1/2". The 1 1/4" was just a little too snug for my liking. The finished ornament (minus the hanging loop!) is 4" x 5" or 10cm x 13cm. A teeny, tiny quilt!


The pieced back.


Sew Seasonal Blog Hop


Tuesday, 6 November 2012

Paper Pieced Christmas Ornament


When Alyce at Blossom Heart Quilts and Kristy at Quiet Play announced their Sew Seasonal Blog Hop I knew I wanted to be a part of it. Both Alyce and Kristy have designed Christmas themed blocks (some are pieced and others are paper pieced) that are free to download during the duration of the blog hop. Each day until the 13th of November there are numerous bloggers (23 no less!) lined up to show you what you might like to do with each (or all!) of the blocks.


If you link up on November 30 with your own finished products using Alyce and Kristy's patterns you can even be in the running to win some fabulous prizes.

Zoe's quilt is now backed and pinned. Ready for quilting!

Now, some of you may remember that I was working on Zoe's quilt. An enormous, very generous king single sized quilt with lots of overhang so that it is very easy for Zoe to make her bed in the morning! This thing really is massive. I'm tempted to stand on the scales with it just to see how much it weighs! I was having a conversation with myself about how it wouldn't be wise to start (yet another) project before finishing Zoe's quilt. In the end I decided that it would be fine to do a little project - start small so to speak - until Zoe's quilt was completed and then I could give myself permission to have a go at some of the fabulous projects that have been showcased on the blog hop so far, as well as a few of my own that have come to mind.

And so it was settled. A small project would be fine. But what to make!

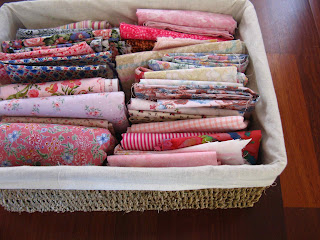
Some months ago a lovely lady at church asked me if I wouldn't mind if she gave me some quilting fabric. She had quilted for many years a little earlier in her life, but was now at an age where she had long since stopped and the fabric was taking up much needed space. I think this kind lady felt as though I were doing her a favour, however it was I who was the recipient!

Some of the lovely fabric!

The fabric was beautifully folded and stored in baskets. In addition to the baskets (of which there were four) there was an enormous 'pickle pot' filled with scrap pieces. I was also gifted at least half a dozen quilt tops that were completed or near completion. It was like a dream!

When I saw Kristy's paper pieced Christmas blocks, in particular the Christmas gift, I thought of this kind lady and the gift she had given me. I thought it appropriate that I make her a Christmas ornament (starting small remember!) symbolising her generous gift to me. I chose fabrics that she had given me, in particular the soft pinks and shabby chic style that she loves so much.

Here is the progress so far.
Isn't this the sweetest?
The paper pieced gift came together very quickly. I decided to keep the quilting simple due to the size of the ornament and to ensure that the gift remained the focus. I use a variagated pink Aurifil thread to do one line of echo stitching. I also trimmed the block on the left and right to give it a more rectangular shape and to avoid it being mistaken for a coaster!

I have cut a 1 1/4" length of pink ticking for the binding. Alas, my 15 minutes of blogging is up and it is time to pick everyone up from school, so the binding will have to wait until this evening. A loop of pink ribbon at the top for hanging and it will be sweet and complete!

Sunday, 4 November 2012

Fresh Squeezed Fabrics

Baking Day


Randi at Fresh Squeezed Fabrics is offering you the chance to design (and win!) your own beautiful bundle of fabric!

You choose 8 fabrics from Fresh Squeezed Fabrics, create a photo mosaic of your chosen fabrics and then name your bundle.  Then link it up here!               

I have named mine Baking Day - appropriate for me as I love to bake! I chose Everything is Nice--Baked Goods in Bright as my feature fabric and then chose other fabrics to represent what baking day means to me.  All the colours are pulled from the feature fabric. The yellow elephants (Savanna Bop--Elephants in Yellow) represent the shaped biscuits the children and I often make, the brown retro floral symbolises aprons and family traditions, and the utensils...well, all the washing up! The green with dots remind me of pearl necklaces, as women can be both practical and beautiful!

I love these fresh colours and the retro feel.              


Friday, 2 November 2012

Bee Block Tutorial


I have finally chosen my block for the Rainbow Bee I am participating in (and not too soon - I am Queen Bee in December!). It is the block from the Moda Bake Shop's Ruby, Pearl and Opal Quilt designed by Corey, from Little Miss Shabby with a minor change. I'm going with a black and white colour palette, with one tile in a vibrant, tone on tone rainbow colour.

So, let's get started!

This tutorial will yield TWO blocks 12.5" square. It is Corey, from Little Miss Shabby's tutorial with my photos so that you don't get confused with the change of colour palette!            

FABRIC NEEDED:

Scrap of vibrant, tone on tone in your nominated rainbow colour (I have used a Kaufman green in this case!).

Small pieces of 4 - 8 different black and white prints. If you don't have 8 different prints, then just double up on what you have - you will need a minimum of 4.

5 inches (15cm) x WOF or half a fat quarter of Black Homespun

Black Fabric Cutting Instructions:
Cut the black Homespun into the following rectangles (cut 3 @ 1.5" x width of fabric strips and then subcut, or use scraps/smaller pieces):

2 @ 1.5" x 12.5"
4 @ 1.5" x 8.5"
2 @ 1.5" x 5.5"
4 @ 1.5" x 3.5"
2 @ 1.5" x 2.5"

Suggestion: Cut the black strips 1/2 an inch longer than suggested and then trim to exactness to reduce 'fiddliness'.

Cut black homespun as per the list above (2 in each pile)

Black and White Print Cutting Instructions:

From the assorted black and white prints cut the following rectangular tiles (NOTE: If you are doubling up on prints (i.e. using a print more than once in each block) refer to the block layout diagram to ensure that the duplicated prints don't end up next to one another!):

2 @ 2.5" x 5"      (unit F)     
2 @ 2.5" x 3"      (unit G)   
4 @ 3.5" x 2"      (used for unit C)               
2 @ 3.5" x 3.5"   (unit A)    
2 @ 3.5" x 4.5"   (unit B)
2 @ 3.5" x 8.5"   (unit H)    
2 @ 5.5" x 3.5"   (unit D)    
2 @ 5.5" x 4.5"   (unit E)


***Before cutting, choose a tile - any tile - for your coloured fabric. For this tutorial, I have chosen the 4.5" x 5.5" tile (unit E).  Cut two of your nominated tile size out of your coloured fabric. Then cut all the rest of the tile sizes from the black and white prints.

***Cut 2 of the 3.5" x 2" tiles in one print and the other 2 in a different print - they will be joined together later to make unit C.

***It is a very good idea to label each unit so that you won't have to keep checking their size (like I did!) to make sure you are using the right one!

Prints cut as per the list above (2 in each pile)
After cutting you should have 18 rectangular tiles.

Piecing Instructions:
{All seams allowances = scant 1/4"}

This is the block layout.


With right sides together, sew together 2 of the 2" x 3.5" pieces. Ensure that they are different prints. Press seams open.

Trim to 3.5" x 3.5" blocks.  These will be unit C.

Unit C

Begin by sewing the A/B/C strip section section together with the 1.5" x 3.5" black strips.  Press all seams towards the black strips.  The completed strip sets will measure 3.5" x 12.5" and will be referred to as A/B/C strip set. If the strip set needs trimming, trim off at unit A.
A/B/C strip set
Sew together pieces D and E along with the 1.5" x 5.5" black strip.  Press seams towards the black strip.  These strip sets will be 5.5" x 8.5" and will be referred to as D/E strip set. If the strip set needs trimming, trim off at unit E.


D/E strip set


Sew together pieces F and G with the 1.5" x 2.5" black strip.  Press seams towards the black strip.  The strip unit will measure 2.5" x 8.5" and will be referred to as F/G strip set. If the strip set needs trimming, trim off at unit G.


F/G strip set


Sew together a D/E strip set, an F/G strip set, piece H, and the two 1.5" x 8.5" black strips.  Press all seams towards the black strips.  These strips sets will measure 8.5" x 12.5". If the strip set needs trimming, trip off at the end with units D/E.


D/E strip set added to a F/G strip set and unit H


Now sew together the strip set you just completed, the A/B/C strip set, and the 1.5" x 12.5" black strip.  Press seams towards the black.  These will be your completed blocks and will measure 12.5" square.
 

The finished block!


Tuesday, 30 October 2012

Starflower Bee Block for Helen

This is one of two Bee blocks I made for the Rainbow Bee that began this month. Helen was the Queen Bee and she chose this stunning Starflower Block in rainbow colours. Ellison Lane Quilts provided the original tutorial, with a minor tweak as requested by Helen to give the block a slightly more scrappy look. I think this is a fabulous Bee block and am tempted to select it for myself if I have the opportunity to participate in another Bee (will get through this one first - it does last a year!). The block itself is absolutely stunning. As much as I enjoyed making these blocks - there is an immense amount of satisfaction seeing all those points line up - I was glad that I was only making two! I don't think I would throw myself into making an entire quilt top with these blocks. Having other quilters make them for me is very appealing!

I am working on a tutorial for the time when I am Queen Bee and will post it as soon as it is done (though I need to get a move on as it is my turn in December!).

Block from Lori

This is the stunning log cabin block I received from Lori this month. Lori lives in the US and she also included a few other treasures; two lovely pieces of Christmas fabric and a letter 'M for Masson' ornament! The fabric Lori has used in the log cabin is beautiful. I really love the traditional Christmas colours and designs, as Christmas for me is not just a fun, family time of the year, but one of joyous yet reverent celebration.

Monday, 29 October 2012

Felt Faces For Busy Bags


There are quite a few blogs out there in blogland that I enjoy. They provide all kinds of inspiration and ideas. One of these is by Hannah from Paint on the Ceiling. Hannah and Bek at Just For Daisy recently hosted a 'Busy Bag Swap'. Hannah's blog describes a busy bag as: "a small zip lock bag (or similar) containing an activity that can be done independently or with minimal assistance by your toddler! Basically it's a simple yet engaging activity to keep them busy while you're busy! Great for the car, shops, waiting room or while cooking dinner!".

Each participant chooses an activity and then makes 11 busy bags. I chose to make 'Felt Faces' (here is probably a good spot to say that I didn't want to go near a pair of scissors or felt for weeks after all that cutting!). I kept one busy bag for myself and then sent the other 10 off to Hannah and Bek to sort and distribute to everyone. This week I expect to receive 10 other different busy bag activities!


One of the many felt face configurations!
Felt Faces or Funny Faces as it is referred to by some is not my own idea. Pinterest and a Google search will come up with a vast array of commercial and homemade versions. I took the idea and made up my own components. The face just fits on an A4 piece of paper. My favourite pieces are the eyes - three different coloured pieces of felt sewn together (I wasn't comfortable just gluing them together if they were going anywhere near toddlers!).


Admittedly, I made myself (and another for a dear friend!) an extended  version of the busy bag that I sent off. Ours has some extra felt face pieces such as glasses and pink hair!


While this activity is ideally aimed at younger children, even Zoe (8yrs) has enjoyed making all kinds of kooky faces.


This would make a fantastic gift for a family with little ones. And the bonus?...very inexpensive!
Related Posts Plugin for WordPress, Blogger...