Wednesday 18 January 2017

under 35's quilt competition {lily}


Hi, It's Zoe here! Today I am posting a second post about our Brother Under 35's Quilt Competition entries.

Lily also entered the Brother Under 35's quilt competition (see the post on my quilt here).

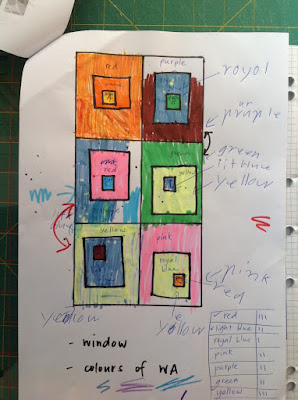
This is Lily's first quilt and one of her first sewing projects. She sketched her design before beginning to sew.

Mum helped her to work out the maths for each block.
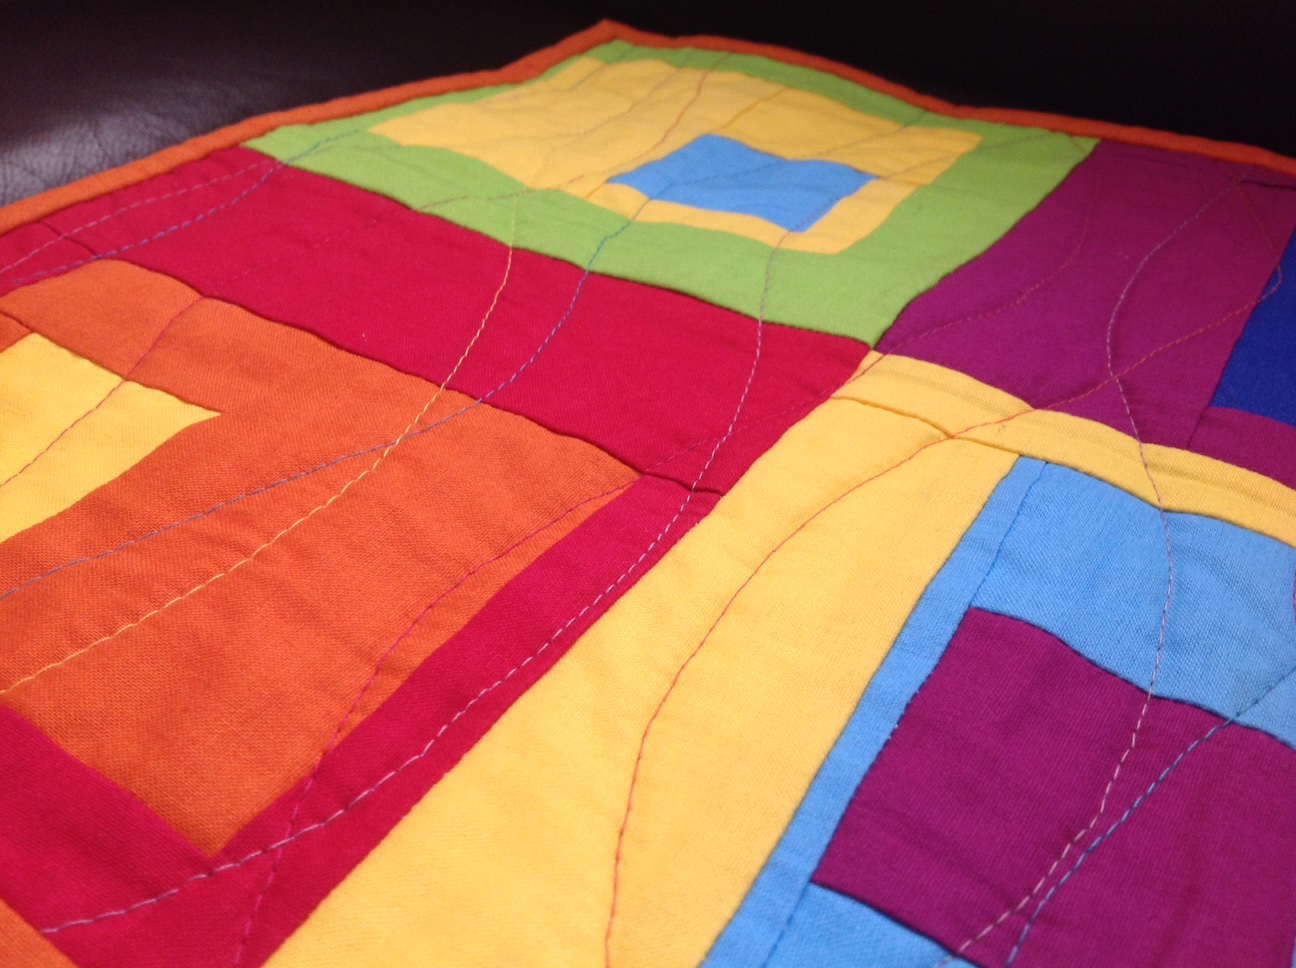
Lily interpreted the competition theme of 'My State' by responding with the colours that she associated with Western Australia. A combination of red, green, blue, yellow, orange and purple solids were pieced together to make the individual blocks.

Untrimmed blocks.
Completed quilt top.
Preparing to baste.
Basting.
Lily backed the quilt in a solid purple. The quilt is quilted in numerous wavy lines in selected colours from the Alison Glass Essential collection.

Lily's quilt measures 33 x 50cm (13 x 19.6in).
A short paragraph describing the  quilt was one of the requirements when completing the application process for the competition. This is what Lily wrote:

I designed my quilt to show the colours of WA. The squares are windows looking through to the colours. The colours represent the sunset, native flowers, ocean, grass, sun and earth. The wavy line quilting respresents the wind and waves.

Lily is yet to give a name to this quilt. Do you have any suggestions?

Tuesday 10 January 2017

under 35's quilt competition {zoe}


This is a special post from Zoe. Here she is:


Hey everyone! Today I am posting about my entry in the 2015 Brother Under 35's Quilt Competition (I know - 2015! This was AGES ago!!).

I have entered this competition twice before; in 2012 and then in 2014 (the post about my quilt can be found here).

The most current (now two years ago!) theme was 'My State'. This could be interpreted as either the state in Australia in which you live, or a state of mind or feeling, like a state of tidiness, colour, busyness etc. The only requirements for this competition were that the quilt be a portrait orientation and no bigger than 100 by 50cm in size.

I chose to use my state of Western Australia as my inspiration and this image as the basis of my quilt:

Image Source
Pink and white everlastings grow wildly in WA. We have tried many times to grow them in our own backyard, but are yet to have success.


I started my quilt with some curved piecing using two blue fabrics. I then attached the green 'hills'. The everlasting 'stems' came next; these were strips of green fabrics appliqued on to the 'hills'. I left the edges of these strips unfinished (raw), to add texture.


Then came the everlasting flowers. I made a lot of pink yo-yos in varying sizes and shades and sewed them onto the stems. I sewed a yellow button in the middle as the pollen.


 The quilt top was spray basted, and two lines of quilting were added to the sky. I also tied the three layers together using cotton embroidery thread.


 The quilt was bundled up with the entry form and taken to the post office to be posted express post to Sydney (the quilt was tracked the whole way with fingers crossed that it would arrive before the deadline. It did!).


 And there we have it - a finished quilt!


Time passed, Lily's entry (another post coming soon on hers!) was sent back to us in the mail. But mine was nowhere to be seen. Then we received an email from Universal Magazines.

My quilt was awarded third place in the K-6 category!

For any Quilter's Companion subscribers,  my quilt can be viewed on page 16 of issue #79 (May/June 2016).


Australian Quilters Companion Magazine - Issue #79
Image Source


Here is my quilt in the magazine:


Special shout out to Mrs G for telling us about this competition!

For upcoming years, what do you think makes an award-winning quilt?


Zoe x

Saturday 16 July 2016

those purple bags

Want to know what was in those bags?
These!
It's a bit gloomy here at the moment - it is winter after all - so this photo doesn't depict the bright, cheery colours as they really are.

We had a dozen girls spend a morning with us during the week tie dying shirts. Since tie dying is not really a group activity, while they were waiting for their turn with me at the kitchen sink we (well, Zoe!) organised some other activities for them to do.

In addition to some board games, the girls enjoyed making a flextangle (these are very cool - have a look at the video on how to make one!),

 painted mints using food colouring and a toothpick,
decorated biscuits 
 and made a Christmas tree ornament (it's never too early to start preparing for Christmas, right?) using a rubber bouncy ball, pins, beads and sequins.
We had lots of fun! But I am glad to be rid of the purple bags from my kitchen!

Wednesday 13 July 2016

bits on the side

 
I have managed to go near the sewing machine again. Woo hoo! I even tidied up around it. Double woo hoo! Two weeks of school holidays has been wonderful (despite having to unblock a toilet approximately every three days and about 57 dental, orthodontic, specialist or other appointments). I feel like I have caught up on quite a few tasks that I just don't have the luxury (!!) of getting to during the school term. Come to my house and I'll show you my (now) clean grout between the floor tiles (so easy to clean if you use white vinegar and a stiff scrubbing brush)! Such a luxury being able to scrub grout!!!

Anyway, I digress. I have always wanted to make some flying geese, so when I came across the Summer Solstice Quilt-A-Long, with it's wonderful flying geese tutorial, I couldn't resist joining in.

My plan is to turn these strips of flying geese into a quilt top. It would be nice to finish it before school goes back, but who am I kidding? I'll try not to fling it on the unfinished project pile and give myself until the next school holidays to complete it.

I also managed to go to the post office and mail two lots of these:
They are the items I have sent my Pay It Forward volunteers. I made two travel tissue holders and included a few other bits and pieces that I thought they each might like (including a teeny bit of chocolate. So good.). Hopefully I will hear from them in the next week or two saying that their little package arrived safely overseas.

My daughter pointed out that I was a tad late in sending them (thank you daughter), but I hope that Anthea (who sent me my lovely arm chair sewing caddy) won't mind.

I've had a few bee blocks go in and out, including these that I made for the relevant Queen Bees.

Terrible photos really!

So, before I head off to unblock another toilet, what do you think I/we did today? Here's a clue:
Lots of bags on my kitchen bench that will sit there for 24 hours.

Can you guess?

Thursday 21 April 2016

scrap jar stars

I had a hard time deciding on a bee block for when I am Queen bee next month. I entertained lots of possibilities, but dismissed each one for a variety of reasons; too big, too fiddly, too difficult, it had already been chosen by someone else or would probably require a fabric purchase by those who would be making it for me (I would prefer participants to be able to use what they already have).
I love scrappy quilts, so I finally settled on the scrap jar star block by Amber who blogs at Gigi's Thimble. 

Here is my version of the block; I decided to resize it to use 2.5" squares in the centre 16-patch. I also changed the making of the half square triangles to a method that I prefer (because it makes two and doesn't require any sewing on the stretchy bias of the fabric).


Scrap Jar Star
This block measures  16.5" x 16.5" unfinished.

Fabric Requirements

White fabric
8 @ 4 7/8" x 4 7/8" squares
12 @ 2.5" x 2.5" squares
4 @ 2.5" x 4.5" rectangles

Bright scraps
12 @ 2.5" x 2.5" squares
8 @ 4 7/8" x 4 7/8" squares (for 8 different star points) OR
4 @ 4 7/8" x 4 7/8" squares (for star points with repeated fabrics)


Construction

Making the centre 16-patch:
1.  Sew a 2.5" x 2.5" white square to a 2.5" x 2.5" scrap square. Do this another 7 times for a total of 8 pairs. Press seam open towards the scrap square.

2.  Sew two pairs of white/scrap squares together. Do this another 3 times for a total of 4 strip sets.
3.  Lay out the strip sets in four rows so that the white and scrap squares alternate.
4.  Sew strip sets together. Press these seams open. Set aside.


Making the star points: 

1.  Draw a diagonal line from corner to corner on the back of each of the 4 7/8" x 4 7/8" squares.

2.  Place a white 4 7/8" x 4 7/8" square and a 4 7/8" x 4 7/8" scrap square right sides together. Sew 1/4" either side of the diagonal line. Cut along the diagonal line. Do this another 7 times (or 3 if you are using 4 different fabrics) for a total of 8 half square triangles (HST's).
3. Press the seam towards the scrap fabric. Trim the little white 'ears'. ***Put aside one of the HST's  
    from each pair if you have chosen the 8 square option so that the star points are each a different fabric (you could use these to make two scrap jar star blocks at the same time!).


4. Sew two different HST's together. Press seam open. Do this another 3 times for a total of 4.

 Making the corner blocks:

      3. Sew a scrap 2.5" x 2.5" square to a white 2.5" x 2.5" square. Press seam towards the scrap square.
     2. With the scrap square at the top, sew a white  2.5" x 4.5" rectangle to the left of scrap/white        square unit. Repeat with another unit for a total of 2.
     
3. With the scrap square at the top, sew a white  2.5" x 4.5" rectangle to the right of scrap/white  
square unit. Repeat with another unit for a total of 2.


Assembling the block:
1.  Sew two of the sets of HST's to opposite sides of the 16-patch.  Press seams towards the 16-patch.
2.  Sew a corner block to each side of a set of HST's. Ensure that the scrap square is in the outer corner. Repeat for the remaining set of HST's.
3.  Sew a HST and corner block set to the top of the 16-patch. Repeat for the bottom of the 16-patch.
And you're finished!

Let me know if you make my version of the Scrap Jar Star block. I would love to see photos.

So, what are you working on at the moment? Something sewing related? A project at work? Something for your family? Or perhaps something for yourself!

Saturday 5 March 2016

1960's dress ups

Before my mum moved into a care facility I was at her house sorting through a few things when I came across some dress ups that we had as kids. I am one of four children and I was born in the 70's, so I don't know exactly how old these are. What do you think? The 60's? 50's? I have a feeling these belonged to my grandmother. I should ask my mum!
Is this a dressing gown? I'm guessing you wouldn't want to forget to put your pj's on first!
Both are a little worse for wear play, but I love them! They brought back some childhood memories that made me smile. I remember dressing up in these quite a lot during my younger years.

That lime green colour is making a comeback!
Thank you to Lily for (reluctantly) modelling these precious items.
As a child I would always choose to wear a head scarf or fabric hair band if I didn't have to tie my hair back. How groovy is that print? I really wish that I still had all my child hood hair accessories. I'd love to wear them now.

Do you have any items of clothing from your parents or grandparents era? I just remembered a 1970's Robin Hood Green stretchy polyester number hanging in my wardrobe that I feel like putting on...
Related Posts Plugin for WordPress, Blogger...