Saturday, 28 September 2013

Birthday Tea Towels


I celebrated another birthday during the week (it happens!) and had a lovely day. I was showered with home made cards and kisses from my children, along with a new camera from Tim (and kisses from him too of course!). I also enjoyed a birthday lunch with one of my dearest friends. We have been friends since year 8 and continue to enjoy one anothers company. She surprised me with these absolutely adorable tea towels. Her gift was soft, flat and squarish, so as I was unwrapping her gift I was sure it was fabric. Well it was fabric - just not the quilting cotton that I thought! I was absolutely delighted!! They are all linen - most of them Irish linen to boot!
Look at the eyelashes on the donkey (they remind me of Eli's!)!

How cute are these Christmas angels?

I always have some cooked, mashed pumpkin in the freezer (for pumpkin pie - canned pumpkin is not readily available in Australia. Besides, the fresh stuff is sensational!), so I think some of Flo's pumpkin scones will be making an appearance this week!

Flo Bjelke Petersen was a member of the Australian Senate and the wife of Queensland's (a state of Australia) longest serving Premier Joh Bjelke Petersen. As the tea towel suggests, she was well known for her pumpkin scones!


Friday, 27 September 2013

Rainbow Girl

A couple of weeks ago I purchased two stitcheries from Wendi at Shiny Happy World who was hosting a Finished Stitches Challenge. The challenge works like this: participants purchase stitcheries from Wendi for a penny plus postage and then turn them into something. I love to sew, but stitching is not something that I have done a lot of (I think it might be because I can sew fast, but I can't stitch fast. I like fast!). So the opportunity to play with someone else's hard work stitcheries was very appealing. Hence my purchase of two!

Eli and I checked the letterbox this morning and  I recognized the postmark on one of the envelopes - my stitcheries! When I was selecting the designs there was no indication of size - part of the surprise woven in to the challenge by Wendi!

I was keen to get going straight away, so I chose 'Rainbow Girl' to use on my first project. She's a cutie - 7cm (2.5") tall and 3cm (1.2") wide on a calico background.

Following a tutorial from Sweet Bee Buzzings (thank you Pinterest!) I made a small, flat bottomed pouch. It measures 13cm (5") long, 8cm (3") high and 5cm (2") deep. It is very, very sweet and I think that it is perfect for my appliqued "Rainbow Girl' - just look at her face!

This is the first pouch that I have made that will stay in our house. While it is nice to gift things, it is also nice to keep things sometimes!

My second stitchery is called 'Beep, beep'. Aptly named. You'll have to see what I make with that one - it is considerably bigger than 'Rainbow Girl' (and there is nothing girly about it!). Any suggestions are very welcome (up until now I have not had any inspiration come to me!). You can see what other participants have made here.

So, are you a stitchery person? After writing this post I have decided that I am not. I am also not a hand quilter. Though I am very good at appreciating other people's hand stitching!

Thursday, 26 September 2013

Chocolate Squares Recipe {Thermomix and Conventional}


A few weeks ago the junior football season ended. I was ready for the end. It is a long season and any longer would have just been too long. So the end was perfect timing! Jed enjoys his football and belongs to a great team with a fantastic coach (who writes an entertaining game summary on the football club blog!). Tim and I share the manager role for Jed's team. Each week during the season I made a batch of chocolate squares for the team's after game celebrations. Even though no scoring is undertaken in this age group there are always celebrations!

These delicious chocolate squares (not quite a brownie and not quite cake!) were a big hit, so (with the permission of my lovely friend who shared the recipe with me in the first place) I am sharing the joy!

I have tweaked the original recipe just a little. If you have a Thermomix this is a one jug recipe. If you don't, it doesn't matter! This recipe is very, very simple and very, very bad; you'll be making these often and I will tell you now that they are not healthy! But they are so delicious!!

Here it is - first the conventional recipe and then adapted for the Thermomix:

 
Chocolate Squares


Makes 15 large sized chocolate squares


Ingredients


·      175g (6 oz) butter

·      60g (3/4 cup) cocoa

·      4 eggs

·      325g (1 ½ cups) granulated sugar

·      160g (1 cup) plain flour

·      squirt (1 tsp) vanilla essence

·      250g (1 – 1 ½ cups) choc bits


Method


1.          Preheat oven to 160 degrees Celsius (320 degrees Fahrenheit) - fan forced (170 degrees
        Celsius/340 F if not fan forced).

2.         Grease and line a large lamington tray (roasting pan) – 33cm (13“) x 23cm (9”)

3.          Melt butter and cocoa powder in a saucepan. Turn off heat and allow to cool a little.

4.         In a mixing bowl and using an electric beater, beat eggs and sugar together for 3 – 4 minutes

5.         Add cocoa mix to egg and sugar mixture and continue mixing.

6.         Gradually add flour and vanilla essence while still mixing.

7.          Pour into greased and lined tray (mixture is fairly runny!).

8.         Sprinkle chocolate bits over the entire top.

9.         Bake in oven for approximately 20 minutes (or until mixture doesn’t ‘wobble’ hugely in the 
        centre of the tray. A little movement or 'softness' is what you want!). My oven is hot so I

10.    Remove from oven and allow to cool before removing from the tray.

11.     Dust with icing sugar and cut into squares or rectangles.


Note: Do not overcook! Remove from the oven when it looks slightly undercooked. 


Double the quantity while you’re at it and share them with every person you know – this recipe works just as well with twice as much!


This is how I line my tray after greasing it (which means spraying for me!). Lining two sides is easier than lining four!
Make sure that the sides of the pan that are not lined are well greased. When cooled, slide a knife down these edges before removing from pan.


Thermomix Chocolate Squares


Makes 15 large sized chocolate squares


Ingredients


·      175g (6 oz) butter

·      60g (3/4 cup) cocoa

·      4 eggs

·      325g (1 ½ cups) granulated sugar

·      160g (1 cup) plain flour

·      squirt (1 tsp) vanilla essence

·      250g (1 – 1 ½ cups) choc bits


Method


1.          Preheat oven to 160 degrees Celsius (320 degrees Fahrenheit) - fan forced (170 degrees
        Celsius/340 F if not fan forced).

2.         Grease and line a large lamington tray (roasting pan) – 33cm (13“) x 23cm (9”)

3.          Place butter and cocoa powder in jug. Heat for 4 min, 60 C, speed 3.

4.         Add eggs and sugar to jug. Mix 3 min, speed 4, scraping down sides of bowl if needed.

5.         Add flour and vanilla essence. Mix 30s, speed 6.
6.         Pour into greased and lined tray (mixture is fairly runny!).


7.          Sprinkle chocolate bits over the entire top.


8.         Bake in oven for approximately 20 minutes (or until mixture doesn’t ‘wobble’ hugely in the 
        centre of the tray).

9.         Remove from oven and allow to cool before removing from the tray.

10.    Dust with icing sugar and cut into squares or rectangles.


Note: Do not overcook! Remove from the oven when it looks slightly undercooked.


Double the quantity while you’re at it and share them with everyone you know  – this recipe works just as well with twice as much!


Let me know if you make some chocolate squares!

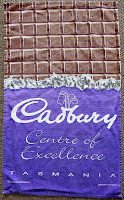
 While we're on the theme of chocolate, look at this delectable tea towel that my online friend Helen sent me!

And, speaking of tea towels, I can't wait to share some absolutely adorable tea towels that a very special friend gave me for my birthday (I was very spoilt!). If you love tea towels you'll need to sit down before you look at these beauties! 

Friday, 13 September 2013

Scrap Bag Challenge - Sneak Peek!


The leg of my jeans!
I am very slowly making progress on my Scrap Bag Challenge quilt. The top is put together, though not without a great deal of frustration! My original method was an epic fail (it required a product that is not yet available in Australia - more about that later!), so I resorted to Plan B. Plan B was fiddly, laborious and left me covered in little threads. I really don't know why I even own black jeans - they are much higher maintenance than blue jeans if you want to slip in a bit of time at the sewing machine!

However, I am pleased with my completed quilt top (thought I would have liked to avoid the unpicking I inflicted upon myself) and the quilting is coming along nicely. Just very slowly.

Here are a couple of photos of the quilt top. Do you think you can guess what it is? Hopefully not, otherwise I may as well have just shown you right up front!!


Can you feel my frustration? Lots of 1 3/4" squares!! Don't look for perfect points everywhere...


Any ideas of what it might be?

Tuesday, 3 September 2013

Bee Blocks - All Finished!


I have thoroughly enjoyed participating in my Bee over the last 12 months. I have had the opportunity to make beautiful blocks that I would not have made time for if I had not committed to the Bee.I have made online friends whom I admire and respect. I have received 22 beautiful blocks that I will sew into a quilt very, very soon. Really I will. After Christmas. And after the children start the new school year. So that means I have just given myself to March 2014!

 Alas, all things come to an end and these pink lovelies were made in August.
Second last Bee blocks!
They will become part of a 'paintbox' quilt like this one from Oh, Fransson! by Elizabeth Hartman.
http://www.ohfransson.com/.a/6a00e54ed0371988330168e9e70d30970c-pi
Paintbox Quilt
Unfortunately in my haste to post off my September - and final - Bee blocks, I forgot to take a photo. They were postage stamp blocks (sometimes known as 'scrap vomit' blocks, but these were using pretty fabrics only!); 49 x 2.5" squares sewn together. When put together they will look as beautiful as this Postage Stamp quilt from Red Pepper Quilts.
https://blogger.googleusercontent.com/img/b/R29vZ2xl/AVvXsEg2vT17Okcn1K0jpcFL4XEa8Ig6aYlINPN0PNf6mZpDmFjQO1pa_nnrQlRPJxA3e1Hq8NSxbEpk6mxHGFu4-WwKC4WJVNogUaUDHi5U1amX-DCQSqQPth5xCQ7zKxIDnKBqkGL_v9AiE0A/s1600/Postage+Stamp+Quilt.jpg
Postage Stamp Quilt
So, now that I have finished be Bee commitments I am looking forward to ticking off a few projects on my {ahem} very long 'to do' list of projects!

First up: my Scrap Bag Challenge quilt. Thanks to a lovely friend I have some beautiful backing fabric for it!

What are you working on at the moment? Or hope to be working on soon!
Related Posts Plugin for WordPress, Blogger...