I am adding my version to the countless number of messenger (satchel) bags out there. My bag was greatly influenced by mmmcrafts and Zaaberry.
 Now, in my opinion, if you are making one, you may as well make two! These lend themselves to an assembly line approach, particularly once all the cutting out is done.
This messenger bag is easy to make, practical and
looks fabulous! If you can use a pair of scissors and sew a straight line you can make one (or a hundred!) of these.
I like to use furnishing fabric (or denim) for it's stiffness and durability, but if you don’t
mind fusing interfacing to the outer body, outer flap and strap pieces, then
cotton works well too!
I am not a fan of sewing zippers, but this zippered
pocket is super easy and adds so much
to the bag. So don't let the zippered pocket put you off (though it is always optional!).
TIP: Prewash your fabric to remove excess dye. Throw
in a couple of colour catchers (available from the laundry aisle of the
supermarket) and iron once dry.
NOTE: Unless stated otherwise, sew with a ¼” seam
allowance. The seam allowance is included in the measurements.
So, let’s begin!
FABRIC REQUIREMENTS:
Using fabric that is 55” wide (140cm), you will need:
·
20” (50cm) for the outer body, lining and strap (I use
a plain colour)
·
12” (30cm) for the bag flap and zippered pocket (I use
a patterned/contrasting fabric)
You will also need a 7” (18cm) - or longer - zip.
TIP: These bags are great for using leftover pieces of
fabric. The outer bag, lining, flap and pocket don’t have to be all the same!
SUGGESTED FABRIC LAYOUT (single thickness):
(Note: not to scale)
IN YOUR CHOSEN FABRIC CUT:
1 @ Bag Outer 25” x 14”
1 @ Bag Lining 25” x 14”
1 @ Strap 45” x 4”
2 @ Flap Pieces 12” x 12.5” (be mindful of directional
prints! The top of the flap is 12”, while the length is 12.5”)
2 @ Pocket Pieces 10” x 7”
NOTE: The strap is the longest length you will need. For children or those who like to have their bag sitting closer to waist height, a shorter length is needed (43.5").
SEWING:
1. Flap. Place flap pieces
right sides together. Fold in half so the folded piece is now 6” x 12.5”. Place
a cd or other similar sized object (mug, lid) in the bottom corner. Trace and
cut in order to round the corners.
Pin flap pieces with right sides
together. Even if you have an aversion to pins and think that you don’t need
them, PIN! Sew around sides and bottom. Do not sew across the top. If you are a
speed sewer, slow down on the curves!
Turn right side out and
press (iron). Top stitch around the edge. I like to sew two rows of
topstitching. Go slowly with the second line of top stitching in order to keep
both lines of stitching the same distance apart all the way around. Sew the
first line of stitching ¼” from the edge. Sew the second line of stitching ¼”
from the first line of stitching.
2.
Internal
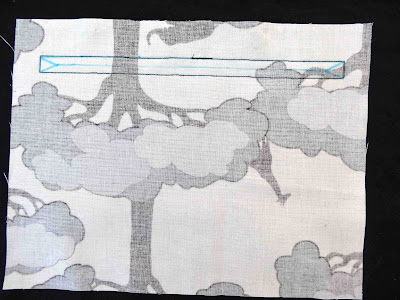
Zippered Pocket. On the wrong side of one of the pocket pieces draw a 6”
x ½” rectangle. Make sure the rectangle is centred and 1” from the top of the
pocket piece.
Draw a horizontal line
through the centre of the rectangle. Mark ½” along the centre
line from each end of the rectangle. Draw a line from this point to each of the
corners of the rectangle.
With right sides together,
place the marked pocket piece on the bag lining 1” from the top and in the
centre. Make sure that the length of
the pocket piece is placed parallel to the width of the lining piece. Pin in place.
With a small stitch length,
stitch on the outside line of the rectangle.
Cut along the marked centre
line of the rectangle, ensuring that you do not cut to the ends, but follow the
‘y’ shapes you have marked. Get as close to the stitching as possible without
snipping through it. This will be your zipper opening!
Pull the pocket piece
through the zipper opening and press the opening so that the seams look pretty
and lie flat. I like to iron from the pocket side first and then the lining
side (front), as shown in the following photo sequence.
 |
| Turn your fabric over so that the lining is now facing up. |
Pin the zipper in place.
Ensure that the zipper pull is entirely exposed at one end (so that it won’t
get caught when it starts being used!).
Note: Place your zipper so that the zipper pull is on the same side as the lining fabric. This is the part that you will see inside your messenger bag.
 Stitch all the way around
the zipper. I use my regular ¼” foot for this (because I didn’t want to have to
change to a zipper foot!) and it is just fine. Start half-way along the zipper.
Stop stitching when you get close to the zipper pull (make sure the needle is
down!), lift up the foot and move the zipper pull away. If you have used a
longer zip, trim the end ½” from the end.
Now we're going to add the back of the pocket.
With right sides together,
pin the second pocket piece to the first. Ensure that the lining does not get
caught up (you only want to be pinning the two pocket pieces).
Stitch around your pocket
taking care to move the lining out of the way so that it doesn’t get included
in the stitching!
3.
Strap. With
right sides together, press the strap in half length wise so that it is 2” x
45”. Sew along the length to close it. Turn right side out using your preferred
method. I usually use a pair of scissors for turning, but at this length I use
the largest safety pin I can get my hands on!
Press and then sew down
each side. The ends will be left raw (they will be hidden later!).
TIP: A tag with
initials on it is a great way to personalise your bag. I use cotton tape and an
ordinary ink pad to stamp initials before sewing on to the strap 3" or 4" from
the end.
4.
Bag
Outer. With right sides together, fold the body of the bag
in half so that the widths are together. Folded, it should measure 14” x 12.5”.
Sew down each side, leaving the top open. Press well, so that the folded bottom
edge has a crisp crease.
Cut a 2” square from the
two bottom corners.
From the one of the cut corners, pull the two fabrics apart
and align the seams of the side with the crease at the bottom.
The raw edges
will also be aligned. Sew along the raw edge. Repeat for the other corner.
5.
Bag
Lining. Same as the bag outer.
6.
Bag
Assembly. Turn the outer bag right way out. Leave the bag
lining inside out. With right sides together, pin the strap to the sides of the
outer bag (open out the seam) and baste in place. I like to overhang the ends of the
strap by an inch; the extra length places some extra distance between the
stitching and edges that may fray.
TIPS:
·
Adjust the strap length according to the recipient. I usually trim the strap to 43.5”
for a primary school aged child (the length includes a 1/2” overlap at each end). For tall children and adults I usually keep the
strap at 45”.
·
Try the bag on when the strap is still pinned and make adjustments as necessary.
·
Make sure the strap is not twisted!
With right sides together
pin the flap to the outer bag. The raw edges of the flap will be slightly
shorter than the raw edges of the outer bag. Centre the flap. Put the bag on
and check that the flap is the right way around when it is closed. Baste in place.
With the bag lining inside
out, pin the bag lining to the bag outer. You are basically putting the bag
outer inside the bag lining. It’s a bit squishy trying to fit the flap and
strap inside as well, but the important thing is to make sure that everything
is tucked inside and the raw edges of the bag outer and lining match up. Also
try and match up the side seams of the outer bag with the bag lining.
 |
| Putting the outer into the lining. |
I like the zippered pocket
closest to the body when the bag is worn, so when pinning I make sure that the
pocket is on the same side as the flap.
Increase your seam
allowance (to ½” or ¾”) and sew around the top of the bag. Start at the non flap
side (just before the strap), leaving a large opening for turning.
TIP: Sew over each end of the strap a few times to make it more secure.
Turn and press the top edge
of the bag. Top stitch, taking care when closing up the opening that was left
for turning.
Stand back and admire your
creation!
If you have any questions - or suggestions - I would love to hear from you!
Please note: this tutorial is for personal use only.
 This year I decided to make a quilt for each of my children's teachers. Call me crazy, but I managed to finish them all a couple of days before we left on our trip to the US. As you can see I was not completely crazy and kept the designs simple. I'm calling this one 'Transport' as it was for a teacher with young boys.


